Winter Camping
Author Stephen Sharp
Winter conditions can exist at any time of the year!
Why do I winter camp?
For me it’s a natural extension of my snowshoeing day trips. It also seemed a shame for me to have a six-month hiatus every year from my favorite activities, which are backpacking and backcountry camping. I found that as I was going to higher alpine destinations during the other times of the year, I was encountering winter-like conditions and if I could do this, I could certainly winter camp.
What are the benefits of winter camping?
While we spend a majority of our time worrying about being safe from the elements, we sometimes forget what the benefits are to winter camping. Here are some of my favorites:
- You can camp almost anywhere.
- Sleeping on snow is soft and comfortable.
- The backcountry is quiet and un-crowded.
- The incredible feeling of self-sufficiency and confidence boost.
My History?
I have been backpacking ever since I was twelve years old but did not seriously get back into it until eleven years ago. My first winter camping trips also started when I was twelve. My first trip was a winter survival experience where I was equipped with a square down bag, a tarp, some matches, and a Swede saw. My recent foray into winter camping started eight years ago. I started with basic three-season gear augmented by some inexpensive additions to get me through an overnighter without being too uncomfortable. Since then I have been constantly upgrading my equipment to make winter camping more comfortable. While most of my winter camping gear is dedicated gear for this activity, I have tailored this article to concentrate on how a newcomer to winter camping can safely get out and enjoy themselves using mainly their three season equipment.
Winter Gear
“It’s all about layering”
Clothing
There are two different classes of clothing necessary to be outfitted with for winter camping; trail clothing and camp clothing. It is very important to have clothing that will not only insulate and protect you against the elements, but it must also be very breathable. You will want to add or subtract a layer, as you feel hot or cold. You will also want your inner layers to be able to wick moisture away from your body therefore I will recommend that they are synthetic. In camp, you are likely to need more layers or a more insulation type of clothing because you are likely to be less active. I advise some kind of puffy down or puffy synthetic type of garments. Always take extra hats, mitts or gloves, and even shirts because you will probably get them wet during your day’s activities.

Sleeping Bag
In order to stretch your three-season sleeping bag into winter, you are going to need to “layer” it. You will need some sort of liner or over-bag to augment your three season sleeping bag’s temperature rating.
Inexpensive fleece liners can be purchased in many local outdoor stores. While I have heard that silk liners can also boost the temperature rating of your bag, I have not tried one.
If you are planning a multi-day trip or using a snow shelter, you will want to consider a bag cover or a bivy. This will not only protect your bag from the elements but it will also add to the temperature rating of your sleeping system. I sometimes take my bivy as well as my tent on short overnighters.
Double up on your sleeping pads. Use a closed cell (blue pad) under your regular sleeping pad for insulation.

Shelter
Unless you are lucky enough to know someone with a four-season tent, you will probably be using your three-season tent or a snow shelter. In either case, I will recommend that you have some sort of sleeping bag cover to protect it from condensation or melting snow. I have had frozen condensation, which has been caught in the mesh of a three-season tent, virtually snow back down on me inside a tent.
A ground sheet is just as necessary in the winter as it is in the other seasons. It will keep your tent from freezing to the top layer of packed snow and add a small amount of insulating qualities. You will also need one in a snow shelter to keep your equipment off the snow. A cheap blue tarp should work fine.
It is essential that your tent fly be as taught as possible because of possible snow loading. You are going to want the snow to either slide off your fly or for the weight to be supported by it. In order to achieve this you are going to have to guy-out your tent really well. Regular tent pegs do not work well in snow. Some sort of anchor, deadman picket, or snow peg will have to be considered. A snow anchor can be something as simple as a buried plastic grocery bag filled with snow. A picket is something long and thin and with a tie-out in the center and is buried lengthwise in the snow.

All my experiences with snow shelters have not been successful or comfortable. They are fun to build but I am claustrophobic! They are definitely warmer than a tent but take at least three hours to excavate. Having to evacuate a snow cave in the middle of a blizzard because the roof was collapsing under the weight of an enormous snowfall has soured me completely on them. My favorite snow shelter is a snow trench. Essentially it is a trench dug into the snow in which sleeping platforms have been cut and is covered by a tarp that is covered with a layer of snow. Remember to bring some sort of sleeping bag cover to protect it from getting wet from dripping melt water!
I find that a candle lantern is an essential piece of gear to use in any shelter or tent. Besides providing light, a candle will help dry out the air and add a little warmth.

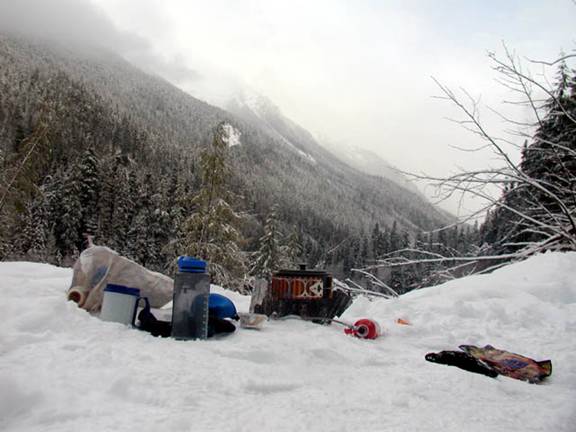
Kitchen
I used to think that it is a nuisance to try and keep a fuel canister at the right temperature for the fuel to vaporize and I used to only recommend using a white gas stove in the winter. Changes in canister stove design has led me to reconsider. Be sure to bring plenty of fuel because you will be using your stove to melt snow for water. A heat exchanger can decrease the amount of fuel you will need by increasing the heat able surface area on your pot. You will also need some sort of stove stand to keep your kitchen from melting through the snow! Something simple like a lightweight like a mouse pad works great.
A large pot for melting snow works best because it takes a large volume of snow to make a small volume of water. Thin walled titanium pots tend to scorch when they have been on a stove for the prolonged times it usually takes to melt snow. An insulated mug or double walled thermos works best for drinking. You can leave the water filter at home because you will boiling all your water and any water left in a water filter will likely freeze and break it. Lexan Nalgene bottles are best for storing you water because the water in them will not freeze as fast as a water bladder and can take boiling water better. I have purchased an insulated jacket for my water bottle but you can make one using inexpensive blue closed-cell pad.
Misc. Gear
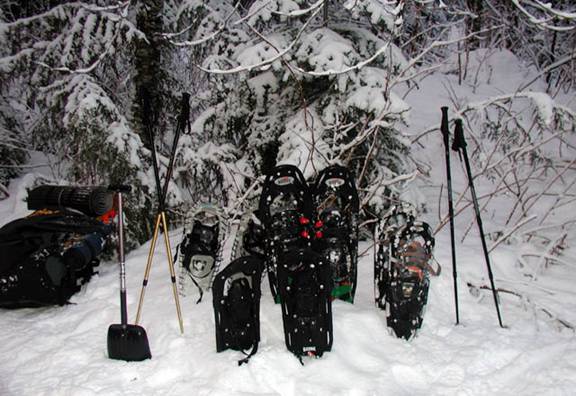
One of the most versatile pieces of equipment I own for winter camping is a metal telescoping avalanche shovel. It gets used for everything from digging snow to being used as a stove cooking platform, a backrest, or a snow anchor.
An ice axe is useful for traversing some steep slopes, as a snow anchor, or for digging other snow anchors out of compacted snow after they have been hardened in place over night.
A dedicated pee bottle will keep you from having to leave your warm bed for those cold nighttime calls of nature. I admit that after a few trips with the same bottle that I now look at it with some disdain.
An insulated space blanket works great as a groundsheet. And an extra small piece of blue closed cell pad makes a nice seat.
Batteries and butane lighters will malfunction if they are left out to freeze. I suggest they are kept in an inner pocket on your body. A Zippo lighter uses lighter fluid and is less prone to freeze up than a butane one.

Getting It All There
Getting to your destination is half the fun! Your means of backcountry travel will depend greatly on the current and forecasted weather or snow conditions. I suggest you rent equipment for the first few times until you find the gear you will be most comfortable using.

Boots
Boots alone work well if there is hardly any snow or if the surface crust is hard enough to support your weight. I personally find that even with the best soles for traction that winter travel with boots is slippery and can be exhausting. With Snow- Seal, Shoe Goo, and tender loving care, you can probably get by with your regular hiking boots and thick winter socks however I recommend a good winter boot.

Crampons
When conditions are icy and traction is more of an issue than floatation, I often wear my 10 pt flexible hinged strap on crampons. Because of poor snow conditions last winter, I ended up wearing my crampons more than my snowshoes.
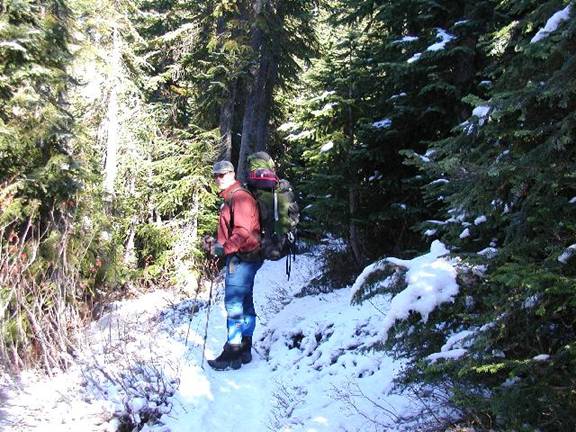
Snowshoes
My first snowshoes were a handcrafted pair made with wood and animal sinew. They had a leather toe strap for bindings and traction was accomplished by sticking one’s toes through a slot in the decking. Today, snowshoes are totally different creatures! Unfortunately shopping for snowshoes can be complicated because there are so many sizes and models to choose from. The size and model will depend on your combined body and gear weight and the type of terrain where you plan on using your snowshoes the majority of your time. Walking in snowshoes on fresh snow is exhilarating and makes me feel like I’m walking on clouds, however it can be exhausting, especially if one is breaking trail. Most trips using snowshoes in the backcountry are not very long for this reason.
Other Methods of Travel
Although I am an avid downhill skier and an experienced Nordic skier, I have no experience with either backcountry skiing, skiboards, or split boards. I understand that one can travel much farther and faster using backcountry skiing equipment.
Gear Sleds
Hauling gear sleds (or pulks) is a great way to get your gear into the backcountry. This takes weight of your shoulders, gives you more floatation, and is really fun to ride on the way back. I made mine using an inexpensive kid’s plastic sled, two pieces of PVC pipe, a couple cleavus pins, some bungee cords, and a nylon waste belt. From previous experience, I have found that flat bottom sleds with no runners work the best.

Technique
Picking Your Campsite
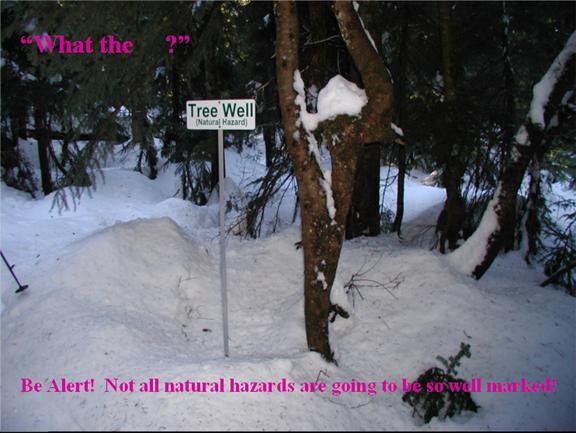
While you can camp pretty much anywhere you want when you are snow camping, picking a campsite, which will shelter you from the elements, is critical. Wind and blowing snow are usually the biggest concerns. You can either dig down into the snow or make a barrier. Luckily snow provides a nice medium to work with to help you achieve this. Spend some time studying the snow drifts so you can your build barriers ahead rather than waiting until you have to. Also keep an eye out for possible avalanche hazards. Mark other potential hazards like crevasses or nearby slopes with wands.
Tent platforms can either be dug out of harder snow or compacted with your snowshoes or ski’s. I find the really nice thing about snow camping is that you can sculpt your campsite as you like. You can make lounge chairs and a kitchen table.
I don’t have any experience with quinzees and only limited experience with other types of snow shelters so I won’t go into too much detail on them. I will say they are much warmer to spend time in. Keep in mind that if you plan to overnight in a snow shelter than you will have to plan a minimum of three hours to build one. From experience, the lee side of snowdrifts and tree wells make good locations to dig a snow cave or a trench.

Staying Warm
We already have learned how layering will help us to stay warm but what else can we do? Once you have set up camp, you may start feeling a little colder once your activity level decreases. Eating warm rich meals high in high calorie carbohydrates or fats will help. Some vigorous exercise such as a small nighttime hike before you go to sleep works very well. Filling your Nalgene water bottle with boiling water and taking it into your sleeping bag with you works as a great hot water bottle. Drinking lots of hot liquids has mixed results at best. Keeping hydrated is very important to keeping yourself warm but if you over do it, you will find yourself up all night with nature calls. I personally think that the timing of your hot drinks is very important. Avoid drinking a lot of caffeinated liquids because this will dehydrate you and excess alcohol for the same reasons. The old myth about alcohol being anti-freeze will get you killed if you apply it! Everything in moderation can’t hurt.
Hydration
In the winter, your water source is most likely to be frozen. This means you will be melting snow for water. Also, you must have water to melt snow or you will scorch the bottom of your cook pot so always make sure that you don’t use it completely up. Since snow is not very dense you will need a large volume to make a small amount of water. This means you need a big cook pot and the denser the snow you find to melt in it, the better. It takes a long time to melt snow so you must carry a large amount of fuel. Heat exchangers can help with your fuel efficiency for this purpose.

The water, which you just spent precious fuel and hard work to collect, will freeze if you don’t find some way of insulating it. Choices available are taking the water bottle to bed with you, burying it upside down in the snow, or keeping it in an insulated jacket. If you bury your water, make sure you mark its location with a wand or some other sort of marker. I have also made pot cozies to delay my water from freezing too quickly after I have melted it.
So Where Do I Go?
Pick somewhere easy for the first time!
Recommended Places for Beginners
I recommend starting the same way I did with easy overnighters. Pick a destination, which isn’t too far from a trailhead and your transportation. I also suggest a location, which might have some sort of permanent shelter or warming hut nearby. In either of these cases there is an easy “bail-out” if conditions do not work to your expectations.

Safety
Always travel with a partner or in a party in the winter. It may be easy to survive in the summer after making a few mistakes but winter is unforgiving. Even a small mistake can kill you. Don’t be afraid and just be prepared!
Weather
Be aware that the weather in the mountains can change quickly and even more so in the winter. Be prepared for the possibility that you may have to lay over until a storm has passed or be able to navigate through it. Never plan optimistically but rather for worst-case scenarios. Always spend the time to study the weather forecast but be skeptical.
Navigation
The winter terrain, which you thought you were familiar with, can become featureless and unrecognizable after a sizeable snowfall. This can be compounded by whiteout conditions. I have been caught out in this kind of weather on countless occasions and it can be very disorienting and terrifying! Consequently, I now wont leave my car without taking a GPS in the winter.

Pay special attention to creek crossings and passing close to trees. Both of these hazards contain pitfalls, which can injure you or may leave you trapped!
Placing bamboo route markers or wands along your route can help you find you way if you haven’t placed them too far apart or if there hasn’t been sufficient snow to bury them. This has happened to me! These wands typically have a personalized surveyor’s tape design on them so you don’t confuse yours from someone else’s.
Avalanche Awareness and Safety
When winter traveling into the backcountry, I highly recommend that you have taken a course and/or have avalanche awareness and rescue knowledge. In fact in nearby Washington State, you can be fined for not being adequately prepared. Being prepared means:
- Traveling with a partner.
- Carrying a shovel, transceiver, and a probe.
- Knowing current avalanche conditions.
Courses are available at local ski hills and with local mountain schools. Avalanche equipment can be rented inexpensively in local gear shops.


Having a leader, who can assess current conditions or risks and route plan based on them, is important. I have been in parties where we have walked single file with good distances between us when we have been under some potentially hazardous slopes.

Conclusion
I hope that I haven’t scared you off attempting winter camping. While it can be demanding, it is also very rewarding. Once you have picked up the necessary equipment and knowledge to winter camp, each trip becomes more easy and enjoyable.

The skills you learn from winter camping will make you a better or more confident camper during the other seasons of the year. So get out and enjoy that snow!
article from http://www.clubtread.com/articledetail.asp?ID=49