
Movement order and methods of overcoming obstacles
Successful travel is largely determined by the ability of tourists to correctly distribute their time and energy, choose the most rational pace and order of movement of the group, master methods of movement across various terrain and techniques for overcoming obstacles. The safe passage of the route and, ultimately, the success of the entire journey depend on the clear and successful solution of these problems.
Below are tips on organizing the mode and order of movement during travel, and recommendations are given on the main ways to overcome obstacles in various types of tourism.
WALKING TRAVEL
Mode and schedule of the hiking day
Hiking day mode. Should provide the necessary rhythm in alternating loads and rest. The transition mode usually consists of 40-50 minutes of movement and 5-10 minutes of rest at small rest stops.
Although the mode of travel depends significantly on the area of travel, season and other factors, the first half of the day usually accounts for up to two-thirds of the day's journey, which takes from 3 to 5 walking hours. It is recommended to set out on the route earlier and stop for the night earlier. In the middle of the day, tourists need a long rest and a hot lunch. In cold or rainy weather, the lunch break can be replaced with a short snack, but with hot tea from a thermos.
Sample daily routine
7.00-8.00 - getting up, exercising, washing, bathing, cleaning the place to stay for the night.
8.00—8.30. — breakfast, preparation for the transition.
8.30—12.30—travel along the route.
12.30-16.00—long rest (lunch, rest, socially useful work, outdoor games).
16.00—18.00—travel along the route.
18.00—20.00—preparing for the night, dinner.
20.00-23.00 - free time.
23.00—7.00—sleep.
Movement speed
The pace of the walking group. It is usually determined by terrain and weather conditions, and allows you to travel 3.5-4.5 km per hour. In a group of beginner tourists, the leader of the hike should set the pace based on the rule: matching the pace of the weakest. If the group is heterogeneous in its composition (which is, in principle, undesirable), we must try to equalize the strength of tourists by varying the loading of backpacks, as well as periodically sending more prepared participants forward for orientation, reconnaissance or choosing a resting place.
The rhythm of movement is one of the main means of preserving the strength of tourists and increasing their performance. On a good road, rhythm is expressed in a constant speed, and in rough terrain - in a constant number of steps over equal periods of time. To maintain the rhythm of the body’s work, the tourist’s stride is lengthened on easy descents, and shortened on difficult sections and climbs. In this case, the usual speed of pedestrians on descents will increase to 5-6 km per hour or decrease on climbs to 1.5-2 km per hour.
You need to change the rhythm smoothly, gradually picking up speed at the beginning of the movement and slowing it down 3-5 minutes before the end. In case of unforeseen sudden stops, it is useful to “tread water” for a minute or two at a steady pace in order to gradually relieve the load on the heart and respiratory organs.
Group movement order
The order of movement of the marching group. Tourists move in a column of one person at a time. There is a guide ahead, who chooses the path and monitors timely stops for rests. An experienced tourist is also placed at the rear. His duty is to help those who are lagging behind and not leave anyone behind. If someone falls behind, he uses a set signal (shouting, whistling, etc.) to let the leader know about the need for an unscheduled stop or reduction in speed. The rest of the group members on simple sections of the route can choose their place in the column arbitrarily.
On difficult sections of the path, it is recommended to place weak participants immediately behind the guide, or even better, next to stronger tourists, so that the latter can provide the necessary assistance to their comrades. When moving along the route, it is not allowed for tourists to be with each other beyond the limits of visual or voice communication.
Place of the leader in the hiking group. Should ensure ease of group management and safety of its movement. The manager can be recommended to follow the guide immediately, from time to time helping him find the way and suggesting the right decisions.
On difficult and dangerous sections (crossing, swamp, scree), the leader himself checks their passability and does not go ahead, insuring tourists, until the whole group reaches an easy section. He should do the same when tourists are swimming in an unfamiliar body of water, when boarding a vehicle, etc.
Line of movement
The choice of route when traveling on foot is determined by the terrain, vegetation and the presence of trails.
Open spaces of meadows, uncultivated fields, as well as small copses, pure pine forests and other easily passable areas should be passed along the azimuth. It is better to cross dense forests with undergrowth, rugged terrain, and thickets of bushes along paths, even if they deviate somewhat from the desired direction.
If the route passes through the taiga or forest where there are no paths, then you should choose the path along the rivers. This is especially necessary in swampy areas, where the driest soils run in a narrow strip along watercourses.
In the forested middle mountains, the line of movement is usually chosen along gentle ridges: it is better to navigate there, it is more difficult to get lost and, most importantly, it is easier to walk than below, in the gloomy gorges. When going out onto open areas of grassy slopes, mountain meadows, and screes, you should prefer convex forms of relief for movement. They are safer in terms of rockfalls and landslides and provide the most picturesque view of the surrounding area.
Overcoming steep slopes
To successfully navigate steep slopes, it is important to have shoes with ridged, non-slip soles, as well as master some walking techniques.
When lifting boots, it is recommended to place them on the entire sole, and not on the toe. At the same time, one must try to maintain a horizontal position of the foot, using each firmly lying stone, a slight convexity of the slope, which is stepped on with the heel of the boot.
The steeper the slope, the more you need to spread your toes. During a long climb, it is recommended to climb “serpentine”: alternately with your left and then with your right side to the slope.
When moving along a grassy slope along it (traversing), the foot of the leg located above should be placed on the entire sole across the slope, and the other foot should be turned with its toe at a certain angle downward.
The descent along a good path and with a light backpack can be done by well-trained tourists by running. At the same time, the legs, almost without bending, are thrown far forward, and the body is tilted back somewhat. On steeper sections they descend on bent legs.
Forest thickets, rubble
Through forest thickets, dense bushes or tall, hard grass they move in a compact group at intervals that ensure safety. Everyone must carefully monitor the person in front and repeat his movements. It is necessary to hold the moving branches so that they do not hit the person walking behind.
To protect from twigs and branches, wear long sleeves (a full storm suit is desirable). One hand is placed forward to protect the face and eyes from branches.
When overcoming fallen trees and forest rubble blocking the path, you should not jump over, but carefully step over and climb over obstacles. We must remember that the trunks of rotten trees are unstable and are often covered with very slippery rotten bark.
It is not recommended to have various interlocking objects on your backpack and clothes: a bucket or pot hanging from the backpack, an ax sticking out of the backpack pocket. Even an ordinary woolen ski cap with a pompom will touch the vegetation and delay the movement of the tourist.
Wetlands
Wetlands on the route are usually crossed along paved paths - gats. If they are not there, then in a safe swamp (preliminary consultation with local residents is required), tourists move by stepping or jumping from hummock to hummock. Everyone should have a pole in their hands, which serves as a support, a probe for measuring depth and a means of self-insurance in case of a fall. When crossing the rafting, the interval between people is increased to 5-8 m. To reduce the pressure of the tourist’s feet on the swampy soil, you can use stepping wicker “skis” or simply tie easily removable pieces of plywood to your shoes.
Crossing with luggage
Water obstacles in simple walking journeys, as a rule, are crossed over ready-made bridges and treasures. If the latter do not have railings and are unstable, then an experienced tourist crosses them first. He will try out the crossing and organize insurance for other members of the group using a pole or hand. To better maintain balance when moving luggage, everyone should have a long stick.
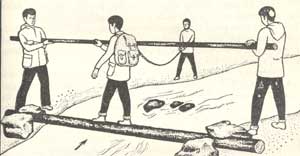 Rice. 13. Crossing with luggage.
It is most difficult to stay on a log if it swings in a horizontal plane. With a few springy squats, these vibrations can usually be extinguished or transferred to the vertical plane, which causes less inconvenience for tourists. Sometimes a rope railing is pulled next to the luggage at shoulder height or a pole is held (Fig. 13).
Fording
Fording without a rope. Fording on rivers with a relatively calm current can be different: alone with a pole, which is used to push against the current; together, standing facing each other and placing outstretched arms on the shoulders of a friend; in a group of 3-4 people (“Tajik method”), standing as a wall so that the strongest and tallest tourists are on the edges, or in a circle, hugging each other’s shoulders.
In any case, the crossing site is chosen after preliminary reconnaissance on the widest possible, and therefore shallower, section of the river.
If there are large stones sticking out of the water, you need to go slightly downstream of them, where the impact force of the stream is weakened.
It is necessary to cross a river with a rocky bottom or a bottom whose character is unknown with shod feet, taking off any clothing that can increase the water pressure. Each step should be taken carefully, feeling the bottom with your foot.
Fording with ropes. It is carried out on more turbulent rivers. The most physically fit and experienced tourist crosses the water stream first. His task is to move the end of the main rope, which is attached to it with a bowline knot, to the opposite bank (Fig. 14). So that the tourist can swim freely if the current knocks him off his feet, the bowline is tied not on the chest, but on the back.
In addition, an auxiliary rope is fastened to the tourist with a carbine, the other end of which is held in the hands of two belayers, standing on the bank downstream. The handing out of ropes after the person crossing must be done carefully so as not to interfere with his movement and so that the ropes do not rinse in the water. The transferred end is securely attached on the shore to a tree, rocks, the base of a strong bush, or to artificial supports made of stakes, stone tours, etc. Then, using an auxiliary rope with gripping knots, the main rope is pulled tightly above the surface of the water.
Having attached themselves to such railings using a chest harness and a carabiner (the distance from the chest to the main rope should be shorter than the length of the arms), tourists take turns crossing the river. You have to move sideways, fingering the rope with your hands, facing towards the current. For better resistance to water pressure, the body should be tilted back. In case of a breakdown, the tourist is pulled ashore with the help of auxiliary ropes (forward or backward.). Since such a crossing usually lasts a long time, it is recommended to light a fire on the shore to warm and dry the mother-in-law.
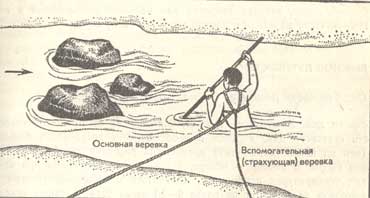 Rice. 14. Fording with insurance.
Crossing by swimming
Crossing by swimming is possible on a calm river and for those who know how to float well. Convenient places for it are deep areas with a gentle slope of the riverbed. Counting in advance for drift down the river, tourists swim at an angle to the current. You should not try to cross an obstacle in the shortest straight line,
It is recommended to put your things on a light raft and push it through the water in front of you.
In some cases, the first tourist is crossed by swimming, guarded by a rope. It is then used to drag the raft and help other members of the group, who can belay themselves by holding onto the water by any non-sinking object - a log, a board, a bundle of brushwood, or a backpack securely packed in waterproof material and tightly tied.
SKI TRIP
Features of the mode, pace, movement order
Daily routine. On a ski trip, it depends on the length of daylight, frost and the need to spend more time (than on hiking routes) setting up camp and getting ready in the morning. In December - January, as well as at other times, when temperatures are low, it is necessary to deviate from the usual regime and set out on the route no earlier than 9-10 o'clock in the morning, and also reduce short rests.
Tempo. When moving on a finished ski track, the overall pace is determined by the speed of the slowest skier. Sudden jerks should be avoided: periodic overheating and cooling in the cold is dangerous to health, and on the route there are not always conditions to change and dry clothes soaked with sweat.
When moving on virgin snow, the pace of the group is determined by the speed of laying the ski tracks.
Movement order. When laying a ski track, several options for organizing traffic are possible. The most common ones are with periodic change of guide, which occurs with a significant thickness of snow cover every 1-2 minutes. If it is difficult to track the ski track, and there are weak comrades in the group, then they should be placed through one and replaced with two guides at a time.
In a large group, it is advisable to select a special team of the strongest tourists to track the ski tracks. It is possible, by dividing the group in half, to organize alternate movement of subgroups; while one is resting at a small rest, the other is laying a ski track. Then the rested tourists overtake their comrades, and they stop to rest.
The order of movement on the ski slope must ensure the safety of the group and at the same time take into account the technical capabilities of each skier. Before the descent, the leader determines the path, the order of descent of tourists and outlines a collection point under the slope.
If the slope is large and closed, then you need to go down in stages with intermediate stops. In order to avoid falling (quite common for the third, fourth and subsequent tourists, when with sharp braking they are “carried out” along the ski track to virgin soil) and to speed up the movement on a safe slope, you can descend on several parallel ski tracks. When passing slopes where there is no complete guarantee of their avalanche safety, it is necessary to place an observer.
Line of movement
The line of movement in winter travel is more straight than on foot or by boat. In many cases, you can make a path straight through frozen swamps and ponds. However, you should not build a simple hike only by azimuth. It is better to use any passing ski track or sled road convenient for movement.
In the absence of ski tracks or roads, you can move along clearings, open forests, and river beds. We must always remember that it is easier to go where the snow is less deep.
Behavior in avalanche zone. In winter, avalanche danger increases significantly. This should be taken into account when choosing a line of movement and not planning transitions through concave forms of relief - snow funnels, avalanche chutes, under ridges with overhanging cornices and in general along all slopes where there is a sufficient amount of snow in an unstable state.
Slopes with a steepness of 15 to 60° can be dangerous for avalanches if the snow depth on them is more than 30 cm. While in such an area, tourists should not go out on the route if the forecast is unfavorable - sudden warming or cold, drop in pressure, during and in the first day or two after a snowfall, blizzard, rain, hairdryer.
When moving along a slope, you must avoid crossing it, move only up or down along the line of the slope, remembering that concave slopes are safest in their upper part, and convex slopes in their lower part. Longitudinal depressions on the slope - couloirs and gutters - if it is impossible to bypass them, it is recommended to overcome them in the narrowest places, one at a time and with reliable insurance. In general, you have to move at the highest speed in an avalanche zone. At the same time, the leader needs to ensure that tourists avoid sharp turns on skis, falls - anything that can cause shaking of the slope,
Ascents, descents, braking, turns
Lifts. On gentle slopes, it is recommended to use a stepping step with a slam to better grip the skis with the snow.
On steep and long slopes, tourists move in zigzags (“serpentine”). At the corners of zigzags, turn with a swing turn around the foot, and the turn must begin with the outer ski in relation to the slope.
On short sections of the route, herringbone or half-herringbone ascents are possible. On very steep places, the only way to climb is a “ladder”.
When lifting with a load, the skillful use of pole supports plays an important role.
Ski slope technique. For beginner tourists, who, as a rule, have unedged skis and bindings that do not fix the heel on the loading area, the ski descent technique is limited to the use of the main stance and periodic braking on closed, steep or rolled out areas with a “plow” or “stop.”
Compared to an ordinary skier, a tourist loaded with a backpack has to spread his legs wider on the descent, put one ski further forward and try to fit into the uneven terrain as smoothly as possible. To prevent the backpack from moving on your back under the influence of inertia and changing the position of the center of gravity, it is useful to fasten it to your belt with a special belt.
It is better to move on long slopes in zigzags with turns from the “stop”; on a collapsing crust, with turns by stepping over or in place around your feet.
On very steep slopes, it is convenient to descend by sliding sideways on the edges of the skis. If the slope is overgrown with forest with dense undergrowth, then it is better to descend at a walking pace - a “ladder”. In some cases, if there is a danger of hitting a friend, a tree or a stone, you must be able to apply emergency braking, deliberately falling backwards to the side or simply sitting down in the snow.
Descents in deep, loose snow. On such slopes, tourists must take the appropriate stance (normal - with uniform movement, front - with accelerated, rear - with slow motion) and be sure to remove the toes of the skis from under the snow. Both skis must be evenly loaded. Otherwise, one of them will begin to bury itself in the snow and the tourist will lose his balance.
For a beginner, it is easiest to descend in an oblique descent stance, almost across the slope with a counterslope, which will allow him to easily brake for a further turn on the spot.
Overcoming obstacles
If on the skier’s path there is a ditch, a small stream, fallen tree trunks, or hedges, then they step over them sideways, having first placed the skis parallel to the obstacle. Without taking off your skis, you can cross over a higher obstacle if you sit on it, support yourself with poles on both sides and, raising your legs, move them simultaneously to the other side.
In the forest, you should not drive close to trees - you can easily fall into the loose snow near the trunk or, conversely, in the pre-spring season you can end up on protruding roots or ice.
When driving downhill into the forest on a sunny day, you should slow down, as the sharp transition from light to shadow causes temporary blinding of the skier. It is also necessary to slow down on slopes on icy ski tracks, well-trodden roads, and windy areas.
When overcoming bumps and ridges on the move, the skier must squat a little on his skis, and when crossing a wide ditch or ravine, on the contrary, he must straighten up. These movements must be done smoothly enough so that the inertia of the backpack does not cause a fall.
Overcoming frozen bodies of water. To avoid getting on thin ice, the path should be chosen away from those areas where running water flows into or out of a lake or river. Preliminary reconnaissance requires the place of descent onto the ice, since the ice sag at the coastal edge due to the winter decrease in water level.
When crossing an unknown and untrustworthy body of water, it is recommended to walk at a distance of 5-8 m. The guide hits the ice with sticks to determine its reliability for the movement of the entire group.
WATER TRIP
Features of the mode, pace, movement order
The mode of a hiking day on a water trip depends on the specific route, weather conditions and the watercraft used. For example, for those traveling on rafts or open boats during the rain, it is better to “break” the regime and not leave the overnight stay until it ends. On a kayak trip on a simple river, on the contrary, we can recommend going out on a day trip even in bad weather, waiting only for a little clearing to collect and put things in the kayaks.
The resumption of rain and even its transition to rain are not dangerous for water tourists if they have reliable capes, and kayaks have waterproof decks and aprons. In these conditions, you need to move without lunch and choose a parking lot with an overnight stay in mind. It is clear that you need to stop earlier, since searching for dry fuel and preparing dinner in the rain will be difficult.
The headwind greatly disturbs tourists, disrupting the pace of movement. If the ships have a large sail, it is better to wait out the wind by shortening the morning passage and accordingly increasing the part of the route on “plain” water in the evening, when the wind usually subsides.
Light conditions also influence the mode of a hiking day: if there is poor lighting or a low position of the sun shining directly into the eyes, you cannot go through rapids, rifts, etc. Overcoming these obstacles must be rescheduled for a more appropriate time of day.
Movement order. They travel in boats or kayaks in a wake column with a distance of 30-50 m between vessels. When moving along narrow rivers or with high speed passing currents, the distance increases to 100-150 m.
Obstacles in water travel are usually passed one by one. When approaching them, the ship with the most experienced crew moves forward. Other ships follow it, not moving far from the shore so that it can always land. In case of danger, the crew of the boat in front disembarks and from the shore makes reconnaissance of the further route.
Viewing an obstacle consists of determining its nature, choosing the method and order of movement of the group through the obstacle. Sometimes, for better reconnaissance of the water flow, control buoys (sticks, logs) are dropped into it.
If the fairway is complex and there are obstacles on the banks that are not visible from the water, it is useful to install milestones or place “flyers” who will indicate the direction of turns to the crews of passing ships. If necessary, posts with rescue personnel are set up below the dangerous place; means.
Line of movement
The line of movement in tourist swimming depends on the nature of the water. On small lowland rivers, which are most convenient for beginners to travel, the line of movement of ships is the main stream. Here you need to go through deep places in order to fully use the speed of the current and overcome various obstacles along the fairway.
On large river arteries, tourists must comply with the Rules of Navigation on Inland Navigation Routes and stay close to the right bank along the route so as not to interfere with the movement of large vessels (Fig. 15).
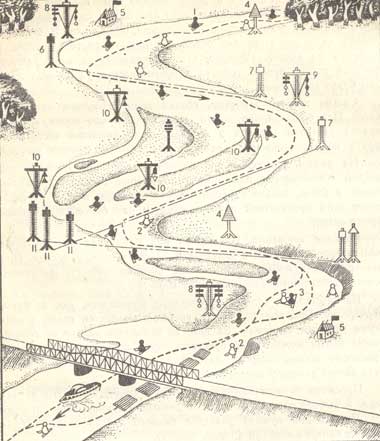 Rice. 15. An example of a shipping situation: 1 - red buoy; 2 - white, sideburn; 3 - mottled buoy; 4 - left bank spring sign; 5 - furnishing post (buyer's house); 6 - right bank. pass sign: 7 - left bank pass sign; 8 — right-bank signal mast: 9 — left-bank signal mast; 10 — semaphore mast: 11 — leading signs
On fast and difficult rivers (for example, foothills), it is advisable to build a line of movement in such a way as to direct the boat from one cape to another, crossing the fairway on the reaches. In any case, when approaching sharp turns or obstacles, it is important not to end up in the main current, which could overwhelm the boat or drag it into high standing waves.
When sailing in open waters, you have to constantly take into account the possibility of strong winds, large waves, surf, and build a transition plan depending on specific conditions, without moving too far from the shore, in order to always be able to land on it.
Oar work
The technique of tourist rowing is not much different from the generally accepted methods of moving on the corresponding boats - pleasure boats, punts, dinghies, etc. It is important that during the rowing process tourists work more with their torsos, make a long drive with some acceleration and lower the oars into the water no deeper than half a blade.
When traveling on a kayak, the rower’s body should, on the contrary, be motionless: tilting towards the rowing blade (a common mistake for a beginner) only causes rapid fatigue.
The main thing in rowing is wide and free movements with maximum muscle relaxation at the moment of lifting the oar and a strong stroke when pulling.
In addition to the basic technique of pulling an oar, tourists must be able to “pull” (actively brake with oars), correctly board and disembark the vessel, move away from and approach the shore on the vessel, and clearly follow the commands “Oars on board!” (at the entrance to a bottleneck), “Sushi oars!” (to stop rowing), etc. The rear rower usually gives the command for such maneuvers and controls the rudder on a tourist boat.
Raft control
Raft control is significant. It differs in that an ordinary raft does not have its own speed in the flow. To direct it to the desired part of the river (with the flow, of course), you have to either rest against the river bottom with poles, or paddle with special oars - stern and bow oars, or, placing the raft at an angle to the current, maintain this position with the help of a steering oar.
When working with poles, you should move them forward as far as possible from the raft, so that, having managed to make a push, you can raise the poles when the raft passes the stop point.
Any braking directly by the pole is excluded: the raft will fall on the pole and knock it out of the hands or throw the person into the water.
At a depth of more than one and a half meters, the pole is practically useless. If the current is weak, in this case you can use a sail and rudder or use ordinary oars. If the flow speed exceeds 2 m per second, then even in shallow water it is necessary to use good rows on the raft.
More detailed data on the technique of rafters, intended for experienced tourists, can be obtained in specialized literature.
Moving against the tide
The line of movement against the current on a rowing vessel is chosen, if possible, where the flow speed is lowest. 'Oncoming rapids at speeds over 2-3 m per second and other obstacles are overcome with the help of wiring. To do this, tourists climb out into the water (their feet must be shod) and, holding the boats two at a time, wade them through the shallow water.
On flat rivers with dry, unforested banks, it is more convenient to move on a towline - a strong rope up to 50 m long. One of the tourists tows the kayak, walking along the bank, and the second, sitting in it, helps with the steering wheel and oar to hold it near the shore. In another option, the second tourist walks along the shore and, using a long pole (5-7 m), points the bow of the kayak in the desired direction.
On small taiga rivers with dense coastal vegetation, when using boats, the technique of walking against the current on poles is sometimes used. At the same time, with poles. Usually two tourists work, one standing at the stern, the other at the bow of the boat. By “pushing” with poles into the river bottom in agreement, they guide the vessel forward.
If none of these techniques are applicable, you have to carry (drag) the boats along the shore.
Sail control
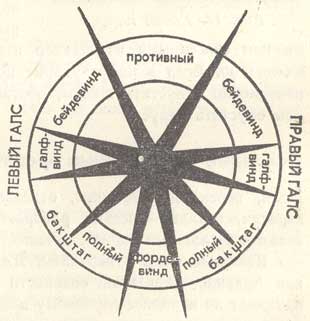 Puc. 16. Names of tacks (courses).
Working with a sail on a tourist vessel is determined by the type of auxiliary sailing equipment and the vessel, taking into account the wind (Fig. 16). If a kayak or raft uses the simplest rack rig, then with a tailwind (jibe) the lower corners of the sail are stretched to the sides by the rods - a straight sail is set. When using a backstay, it is better to convert the sail into a slanting one, attaching one lower corner of the sail to the mast, and the other using a sheet and, preferably, a boom to “catch” the side wind (Fig. 17). When backstaying, sprint rigs are also used.
More complete use of the wind (including on halfwind and partially close-hauled courses) is possible when using sailing equipment close to that of a yacht.
In strong winds, a kayak with a sail should be heeled or two kayaks coupled side by side, turning them into a catamaran. It is also possible to use an oar as a yard to which outrigger floats are attached. Outriggers are made inflatable or glued from lightweight foam in the shape of pointed cylinders. If an unexpected squall hits the sail, you must immediately release the sheets, set the kayak upwind, and then lower the sail.
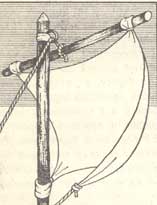 Rice. 17. Oblique sail
Main natural obstacles
Shoals, riffles, rapids, individual stones, drifts, coastal thickets, rubble - very common natural obstacles in simple water travel.
Sandbanks and riffles. For light tourist ships, as a rule, they do not pose a serious danger. Obstacles pass through the deepest place (the so-called “trough”), which can be identified by the dark color of the water, higher current speed, and a large and smooth wave in the wind.
Riptides. Convenient for driving on straight sections of rivers without particularly large slopes, they require caution when turning. To avoid the boat from collapsing on the concave bank, you should leave the middle of the stream in advance and press against the convex sections of the bank.
Toplyaki and Odintsy. On small and medium-sized rivers, it is possible to encounter sunken trees (drifts) and single stones (odins). If these obstacles are under water, then they are recognized by circles on the water, breakers below the obstacle, or by the so-called apex of the triangle formed by two streams of stream breaking against a stone or tree.
If a single obstacle is noticed, it is better to change course in advance and go around it. If this cannot be done, then you should sharply reel in from the side opposite the obstacle, and then level the boat.
Thickets. Bushes hanging over the water and washed-out trees often cause a tourist vessel to capsize (overkill). Therefore, on fast rivers you should stay away from the bulky (concave) bank with overhanging vegetation and do not try to slow down the kayak by grabbing a stationary object from it.
Rubble. They form where fallen trees block a river. In the event of a blockage, the boat has to be carried along the shore or small passages must be cleared. When the current speed is high, it is important to land on the shore in advance so as not to be pulled under this obstacle.
Thresholds
A rapid is a short section of a river with a large drop and velocity of water, usually complicated by numerous rocks or ridges and standing waves from converging streams. You can tell when you are approaching a threshold by the slowing down of the flow and the roar of falling water. Simple rapids can already be found on routes of difficulty categories I-III, so you need to know at least the general rules for passing them.
A simple threshold along a visible fairway is overcome, like a rapid, with a positive boat speed (that is, the presence of its own speed forward relative to the moving water).
If there are a lot of stones in the riverbed and you can’t avoid them, you have to maneuver between them. To do this, you need to push the obstacle on the side and make strong strokes on the other side, trying to “flow around” the stone with the hull of the boat, all the while looking for the further path forward.
On small rivers, tourists should stick to the middle line of the triangle formed by the converging jets of the rapids, because here there are usually greater depths and the bed is cleaner. But on large rivers, where there is a danger of being flooded by standing waves, you must avoid moving through the top of the triangle.
In any case, if a preliminary inspection of the rapid (and this is mandatory for a novice tourist) gives reason to doubt the success of its passage, it is necessary to enclose the boats or guide them along the shore.
Artificial obstacles
Bridges, ferries, some fishing structures, dams, locks, and piers are considered artificial obstacles.
Bridges. On small rivers they usually pass under the highest span. First you need to make sure that in front of the bridge there are no old abutments, drifts, sawed-off piles and other underwater and surface obstacles. It should be remembered that in spans the flow accelerates noticeably. Approach the bridge at low speed, taking the exact direction in advance. Particular care must be taken when passing under bridges that cross rivers at sharp angles—the likelihood of a pile-up on the abutment is greatest here.
Low walkways and luggage. Tourists overcome them by leaning back on the bottom of the boat and first removing the oars (on a kayak, removing the breakwater and backrests). Sometimes it is necessary to scuttle the boat to increase its draft. Then you have to resort to the help of the crew of another ship.
Ferry crossings. They walk in accordance with the position of the ferry: either in the middle of the river above the cable or under it, clinging to the high bank.
Dams, sluices, floating bridges, zapani (chains of logs connected by cable), forest jams, mole alloy. Beginner water tourists must avoid these obstacles. Without coming close to the obstacle, you need to land on the shore and look at the portage path. Before carrying out, boats and kayaks are usually unloaded. If there are no special carts, the kayaks are carried by two people on their shoulders or on their hands, and the boats are rolled along a flat road on stubs of logs with a diameter of 10-15 cm.
In some cases, narrow pedestrian floating bridges or barriers without congestion can be overcome “head-on” by slightly sinking one of the links of the bridge or forest-retaining boom. However, it is not recommended to sink boom logs from a kayak.
You can enter the lock only upon presentation of a route document and upon receipt of the appropriate permission from the head of the lock. In the lock, tourist vessels are not allowed to stand close to the walls and gates of the cells, or to be between large vessels. You should exit the lock from behind the convoy of ships.
MOUNTAIN TRIP
Features of the mode, pace, movement order
Daily routine. On a mountain trip, it usually differs in that it is “shifted” an hour or two ahead compared to the schedule of a walking trip. This is due to the instability of the weather in the mountains (it often worsens in the afternoon) and some specific dangers of the mountainous terrain. Thus, closer to noon, the danger of rockfall increases, the strength of snow bridges decreases, “soggy” snow becomes difficult to pass, and “swollen” rivers become difficult to cross.
On a mountain trip, it is recommended to make the ascent at 4-5 hours, and start the route at 6-7 hours. A long lunch break sometimes has to be replaced by an hour's rest with a small snack, but you need to stop and set up camp for the night at 14-16 hours.
Driving mode. On long ascents, the number of frequent stops to rest changes: every 30 minutes of ascent should be followed by a 5-8-minute rest. On steep sections, one- or two-minute stops (without removing the backpack) are made after 10-15 minutes of ascent. The pace of movement in the mountains largely depends on the specific terrain and slopes: on ascents it is, as a rule, clearly slower, and on descents along an easy path it is accelerated.
Movement order. Strictly in a column, one at a time. When moving along steep rockfall slopes, screes, and moraine, it is not allowed for some tourists to be directly higher up the slope than others. If a different order of movement is not possible, then you should move close to each other.
Line of movement
Selecting the driving line. On mountain routes, as a rule, it is determined by the presence of trails laid by local residents or tourists. Sometimes beginners try to ignore these routes, which is completely wrong. Even if from some point of the climb it may seem that there is a shorter path to the pass and the trail in vain “twists” extra serpentines, it is still better to believe in the “smart” trail. The roundabout route, as a rule, turns out to be the most economical and safe. You can straighten the bends of the trail only on descents. And only if the slope is not very large.
In the absence of trails in mountainous areas and when approaching an unknown pass, it is necessary to organize preliminary reconnaissance in order to choose the best route.
Traffic diagram to the pass in summer. Despite the variety of local conditions, the route to the pass is usually as follows.
Approach to the pass along the valley (preferably along a slope with a southern exposure or covered with sparse vegetation).
Next, traverse subalpine and alpine meadows and climb along screes, choosing their “dead” areas with large stones for the path. Then access to the glacier (along the end or side moraine, along the tongue of the glacier, etc.) and a relatively flat path along the glacier, bypassing icefalls and cracks to a snowy rise or a small rocky wall of a pass saddle.
Climbing to the saddle on snow or rocks is usually done vertically, ensuring rockfall and avalanche safety. Among rocky areas, gently sloping ribs and buttresses are most suitable.
Driving pattern to the pass in winter. In the forest zone in winter, tourists are advised to usually follow the summer trail, but when it gets warm, they should, if possible, go to the northern slope, and when it gets cold, to the southern one.
When leaving the forest, it is advisable to stick to the bottom of the gorge (river bed). If the river is not frozen, then snow bridges created by previously fallen avalanches can be used to cross.
Climbing the glacier is straight from his tongue and in no case under the sheep’s foreheads. Walking along the center of the glacier, it is better to choose concave places on its surface and avoid convex ones. The upper cirque of the glacier is usually overcome in the middle, if necessary, taking off the skis and moving straight “head-on”.
Overcoming grassy slopes, screes, moraines
Of the natural obstacles in mountain climbs of I-III difficulty categories, the most common are grassy slopes, screes and moraines.
The technique of moving in the mountains on grassy slopes is similar to moving along the same slopes on foot. However, in mountainous areas they are much steeper, longer and more dangerous, since they can intersperse with rocky outcrops and are limited from below by sheer faults and ram’s foreheads (flattened rock ledges). On steep grassy slopes, the descent and ascent are carried out in zigzags, trail after trail, at short intervals.
You have to walk up the scree obliquely, choosing comfortable stones to place your feet on. The guide must warn those who follow him about each unstable support. You need to walk so close that a stone accidentally moved from its place by one tourist can be detained by the comrade following him. When descending in a group along the scree, you must be careful that one tourist is on top of the other.
Rocky areas
Movement on rocks requires the application of the “three points of support” rule. This means: you need to move in such a way that in more or less difficult areas, while moving one limb, the others do not come off the supports.
On light rocks, the hands usually only maintain balance and actively work only where there is no comfortable and reliable support for the legs. The torso should be kept as vertical as possible, and the arms and legs should be spread at least shoulder width apart. You should rest on the ledges with the inner welts of your boots. When using the grip (Fig. 18a), do not press against the rocks. This will provide better conditions for footwork. You need to move smoothly, without jerking - this makes it easier to maintain balance and save energy.
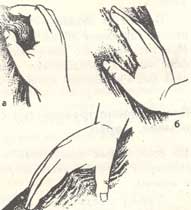 Rice. 18. Hand work when moving along rocky areas: a - grip: 6 - thrust: c - emphasis
To move, you need to alternately use stops and spacers (Fig. 18 b, c), preferring the latter: with spacers there is less risk of failure and less stress on the fingers. In difficult areas, but convenient for moving with a spreader, you need to move straight up. If you need to move to the side, you need to do so. in easier areas.
In the absence or insufficiency of reliable supports on a rocky area, should friction be used as fully as possible? (on slabs, scallops) and wedging force (corners, crevices).
Snow slopes and glaciers
Movement on snowy slopes in the mountains, if there is no special equipment, is permissible on simple snowfields, gentle, safe climbs to a pass, or when crossing firn plateaus.
When moving, you need to use an alpenstock (ice ax) and shoes with hard soles, since the main efforts when walking in the snow are spent on trampling tracks, knocking out steps and maintaining balance.
A tourist should not sharply kick into the snow - it is better to compact the footprint in it with two or three pressures. When moving on fragile crust, you should not try to stay on its surface. It’s better to break through the crust and trample down the step. After all, everyone should take care of those walking behind. Therefore, the distance between the steps must be proportioned by the guide to the ease of movement of the shortest tourist in the group. The body weight should be smoothly transferred from step to step, resting on the entire foot.
When driving on snow, self-belay with an alpenstock is observed. Climbing steep sections is organized “in three steps”: the tourist sticks an alpenstock in front of him and, holding onto it with his hands, drives first one, then the other leg into the snow. Then the alpenstock is moved higher, and the movements are repeated in the same sequence. On gentle slopes, tourists descend facing the valley and press their heels as hard as possible into the snow. The alpenstock is held at the ready. Steep descents take place “in three steps” facing the slope.
If there is a glacier under the snow, then in order to avoid falling into a glacier crevice, you should move in groups of 2-4 people. The one in front should carefully probe the snow in front of him with an alpenstock.
Areas of soft ice with a slight steepness on glaciers open from snow can be overcome in resistant boots or shoes with rubber soles with deep grooves. Your feet should be placed on the ice so that they touch the entire foot.
Steeper sections of the open glacier can be climbed using crampons and cutting down steps on the slope with an ice ax. When walking on crampons, your feet should be placed slightly wider than when walking normally (so as not to catch your boots and trousers with your teeth). The “crampons” are placed on the ice with a light blow with all the main teeth at the same time. In some cases, it may be necessary to create additional support points - driving in ice hooks.
To confidently move across ice, snow and rocky terrain, a deeper knowledge of mountaineering equipment and mountaineering techniques is required. Those who are planning to go on a mountain hike should definitely familiarize themselves with them in specialized literature and practice them almost before leaving for the mountains.
Crossing over rocks and snow
The most common way to overcome a narrow mountain stream is to cross rocks, when tourists step over or jump from one boulder to another, securing themselves with ice axes or alpenstocks. Before crossing, it is important to outline the route of movement and, if possible, check the stability of the supports. Before transferring the entire weight of your body onto a stone, it is advisable to test it with your foot and be prepared, if the support is unsteady, to jump onto the next boulder. In shallow places, tourists can sometimes throw stones into the water themselves to cross. It is necessary to cross mountain rivers in the morning, when the rapid melting of snow and ice has not yet begun.
They cross the snow bridge after reconnaissance of its strength. To do this, the bridge arch is inspected from the water and stones are thrown on it. If there is no complete confidence in the reliability of the bridge, crossing is permissible only one at a time with a rope safety net. The first to cross (crawl) the bridge while probing the snow with an ice ax is an experienced tourist on a belay without a backpack.
Canopy crossing
To organize a suspended crossing, one person needs to wade or swim across a mountain river in order to carry the end of the rope to the opposite bank. Sometimes the rope can be thrown behind a stone, tree or rock on the opposite bank.
After the first tourist has crossed and the rope is securely fastened, they pull it tightly (preferably with a slope in the direction of movement) and begin to cross the rest of the group one by one. To do this, the next tourist is tied with a chest harness, makes a saddle, attaches two carabiners to the main rope and, moving his hands along it, crosses the river head first over the water. With a large slope, the crossing is carried out feet first.
To insure a tourist, two auxiliary ropes are attached to his chest harness through a carbine with a “guide” knot: one stretches to one side, the second to the other. With their help, you can pull out a weakened tourist or drag backpacks along the main rope, which are hooked up with a carbine in groups of 2-3.
INSURANCE AND WORK WITH ROPE
Mutual insurance
Mutual insurance and assistance is one of the immutable rules of traveling athletes. Insurance is closely monitoring a tourist overcoming an obstacle, or providing him with effective assistance to prevent a breakdown, falling, drowning, etc.
Belay methods vary depending on travel conditions, but the most common method is rope belay. The moment for applying insurance is determined by the group leader based on the degree of difficulty and profile of the path, the physical and moral condition of tourists and other reasons.
Preparation of insurance. Includes the following points: distribution of forces of group members to overcome obstacles, determination of the order and sequence of their actions on the belay; checking the means of insurance (rope, means for unsinkability of the vessel, etc.); choosing a support location for the belay, testing it and, if necessary, processing (cleaning, strengthening the site, cutting off sharp edges on the ledge); checking the availability of appropriate clothing (when belaying with a rope, for example, storm suits and mittens are required); providing reliable self-insurance for the insuring tourist.
Simultaneous insurance. It is organized on relatively simple sections of the route and simple obstacles. In this case, all tourists, while on the move, simultaneously insure their comrades.
On foot, this is support during crossings, on water - moving in a compact group when there is a wave, on mountain - moving in groups along rocky areas or closed glaciers, etc.
In simple areas, you can organize gymnastic (ropeless) belaying. It consists of supporting the tourist and holding him when landing after a fall jump. One or two of the most experienced and physically strong members of the group are placed on gymnastic belay.
Railing insurance. Rope railings are most often hung for insurance and the speed of passage of dangerous places by large groups of tourists. When moving along the railing, gymnastic techniques are used: hands are intercepted along a fixed rope, and legs rest against the slope, the crossing log, or the river bottom.
Alternating insurance. It is used on more dangerous obstacles, when one tourist moves and others protect him. Depending on the nature of the obstacles; insurance may vary.
When overcoming areas with rocky terrain or where you can firmly rest your feet, use a rope belay through the body of the belaying tourist. The most common types of such insurance are sitting through the lower back and standing over the shoulder.
If there are large stones, rocks, or trees, belaying over a ledge is more reliable. Sometimes a combination of these types of insurance is used. In the snow, belaying through poles, an ice ax, or skis firmly stuck into the snow is applicable. At the crossing, mobile insurance can be used (the insuring tourist has freedom of movement along the shore). In addition, an “interception” control post should be installed below the crossing point.
The effectiveness of alternating rope belay is largely determined by the ability to take the correct position and position so that the jerk of the rope does not throw the belayer off balance, and the ability to etch the rope when belaying. Securing the rope too tightly may break it or cause serious injury.
Self-insurance and self-arrest
Self-belay before an obstacle. Preparation for it consists of carrying out a number of activities to test your readiness to overcome the obstacle.
They include checking individual equipment (availability, quality, testing it in action); checking individual life-saving equipment (for a water tourist - an inflatable vest, belt, circles; for a mountain tourist - an avalanche cord, etc.); mentally repeating the plan of your own actions necessary to overcome the obstacle; assessment of possible options for failure at an obstacle and emergency actions to prevent injuries; general mobilization of physical and mental strength to overcome obstacles.
Using a stick (ice ax). The basis of self-insurance when passing many obstacles in hiking, mountain, and partly skiing travel is the use of additional support - an alpenstock, an ice ax, a ski pole. If the obstacle is simple, the stick is held with one hand, creating a third support if necessary and helping stability.
When moving along steep or slippery slopes, the stick is held in two hands in the “ready” position: the hand holding the upper end of the stick at chest level clasps the shaft with the palm up, and the other hand, located closer to the lower end (bayonet) of the stick, takes the shaft with the palm down and is at any moment ready to press the stick to the slope. With the help of a stick, you can constantly keep two points of support in motion: while the tourist takes the next two steps, he leans the stick on the slope, then, standing on two legs, quickly moves the stick forward to another point of support, and the cycle of movement is repeated.
When crossing a slope (traverse, zigzag movement), the stick of the stick should always be facing the slope. When changing direction or turning to the slope with the other side, the stick is intercepted by hands without lifting the bayonet from the ground.
On dangerous slopes, the ice ax is also held in two hands (the upper one squeezes the metal head of the ice ax), with the beak down and away from you.
When crossing a ford with a stick, its tip is carried towards the current. When crossing a ford on a rope, it is strictly forbidden to use loops with gripping knots. Self-belaying in a similar way when moving along rope railings can be used on a “dry place” (descents, ascents, traverses), and the length of the self-belaying loop should be shorter than outstretched arms.
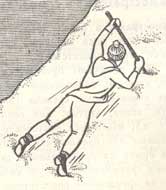 Rice. 19. Self-arrest in the snow.
Self-arrest. Consists of the ability to stop or at least partially slow down a fall, breakdown, etc.
If you fall or slide on a grassy slope or small scree, you need immediate support with a stick (alpenstock, ice ax) into the slope from the “ready” position. If this was not possible and the tourist rolled down, one should strive to immediately roll over onto his stomach, head up, and hold himself in a lying position with a stick. In this case, the stick is held in bent arms and rests obliquely on the ground with a bayonet.
When falling on a snowy slope, the tourist must jerk onto his stomach and, pressing the stick with the bayonet into the snow, gradually slow down the movement. It is very important that the fallen person’s legs are spread wide and their feet rest against the slope (Fig. 19).
Ropes and knots
Ropes. When moving and overcoming obstacles, the most common use of nylon ropes is main (thickness 9-11 mm, length 30-40 m) and auxiliary (thickness 5-7 mm, length 30-40 m and 4.5-5 m). They are used when establishing various crossings, organizing ascent or descent along a steep slope, and when belaying on dangerous rocky, snowy and other sections of the route.
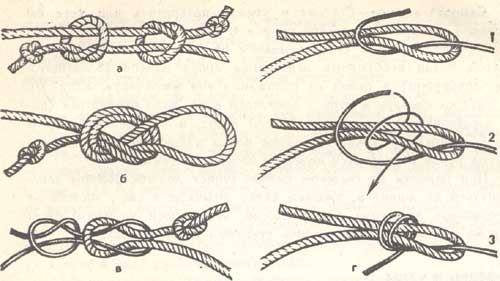 Rice. 20. Tying knots: a - weaving; b – “conductor”; in - direct; g - front clevisKnots for tying two ropes. If the ropes are the same diameter, then they are tied with a weaving or straight (“sea” knot) (Fig. 20 a, c). For different thicknesses of ropes, a bramble knot is used (Fig. 20 d).
When tying knots, you should not forget to make additional safety (control) knots at the ends of the tied ropes: with large loads on the rope, they will prevent it from slipping and untying the main knot.
We must also remember another feature of knots: they should not only hold tightly, but also be easily untied when necessary. Knots in the “self-tying” version are tied with an additional loop of one of the ends of the rope in the knot or with a stick previously inserted into the knot.
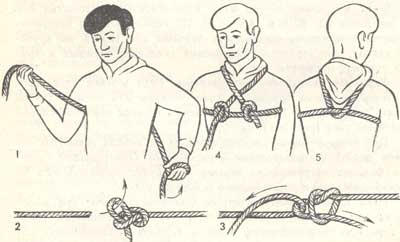 Rice. 21. Tying a bowline knot with suspenders from the end of a rope
Knots for loops and binding. They are used for tying a rope in a loop to a stationary object (tree, rock) and for tying a tourist when organizing belay.
The most common knots are the “conductor” (Fig. 206) and “bowline” (Fig. 21). The first one is simpler; it can be done either at the end or in the middle of the rope, but after tension it is difficult to untie.
When belaying, these knots are usually used in combination with suspenders, creating a so-called chest harness.
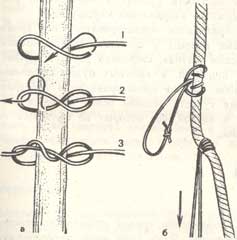 Rice. 22. Tying knots: a - “nooses”; 6 - “grasping”
A gazebo harness is knitted from the short end of an auxiliary rope and is used for overhead crossings.
Auxiliary nodes. The “noose” knot (Fig. 22a) can be used to quickly and securely fasten a rope to a tree, stone, or ledge. Knitted at the end of a rope.
The “grabbing” knot (Fig. 22b) is knitted from an auxiliary rope on the main rope and is used for belaying, climbing, pulling the rope at a crossing, etc. The peculiarity of the knot is that, being loosened, it can easily be moved by hand along the main rope, and when the auxiliary rope is sharply pulled, it immediately tightens. Knitted in a loop at the end of the rope.
The stirrup knot is used for tying ropes, when tying transport devices, lifting, etc. It is easily adjusted and can be easily untied. Knitted at the end and in the middle of the rope.